
There’s a lot of noise and confusion about self-publishing, so let’s simplify.
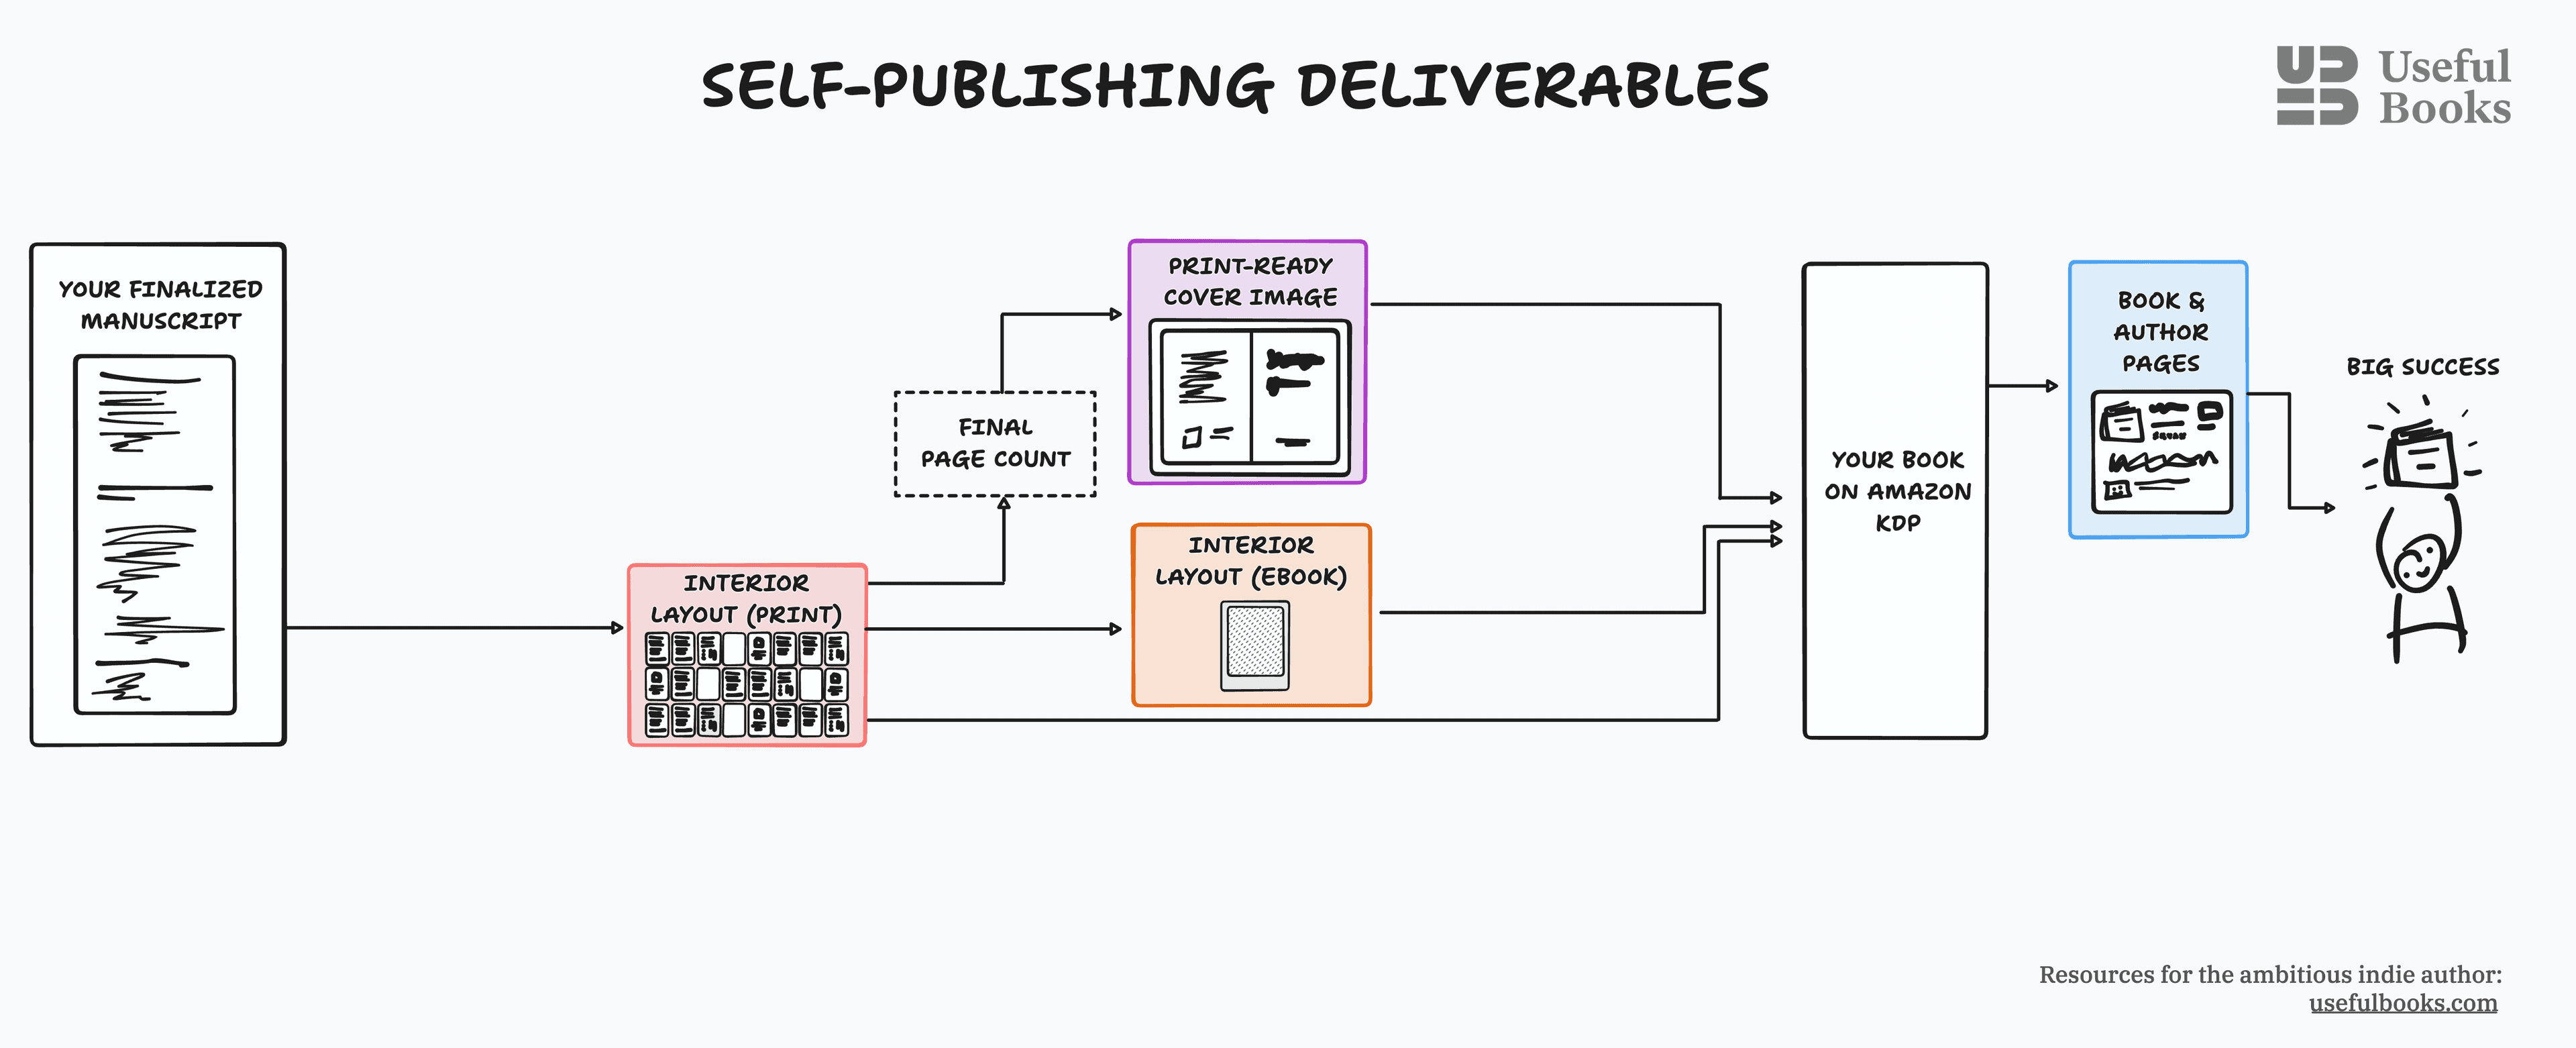
To self-publish on Amazon, you only need 3 things:
- A PDF of your interior layout (properly formatted for print)
- An image of your cover (front and back cover, properly sized)
- Some extra info for your book page (description, bio, ISBN, pricing, etc.)
That’s it. A PDF, an image, and a form.
The "extra info" is pretty easy to figure out at the end, so your focus should be on nailing the first two bits: interior layout and cover.
These are best viewed not as standalone tasks, but as a pair of mid-sized projects (i.e., up to 2 weeks apiece) that must be carefully managed to avoid wasted work and unnecessary delays while achieving a professional result.11Like any other project, you have many ways to reach your goal. Some authors prefer to DIY pretty much everything to save money, while others opt to delegate some (or all) of it to freelancers to save time.
Here’s a simplified view of how these pieces fit together:
The goal of this article is threefold:
- Reduce your uncertainty by ensuring that you understand the high-level view of what needs to be done, in what order, so that you can plan your path and avoid major delays
- Simplify your decision-making by detailing your options for each major task, including the best tools for DIY, and the approximate costs of working with a freelancer22Of course, every book is different, so costs and timings can vary. For example, the interior layout of a book that’s all prose, no visuals, might be finished in an afternoon. Whereas, for something more heavily designed, interior layout might be a major, multi-week endeavour.
- Save you time and money by highlighting the major gotchas, traps, and blunders that can wind up costing weeks—or worse—if you didn’t know to look out for them
Plus, as a bonus at the end:
- Give you our best-practice suggestions on what to pick for all the confusing stuff Amazon will ask about — distribution, ISBNs, and so on
Here's the fully detailed view of the process, with all the dependencies:
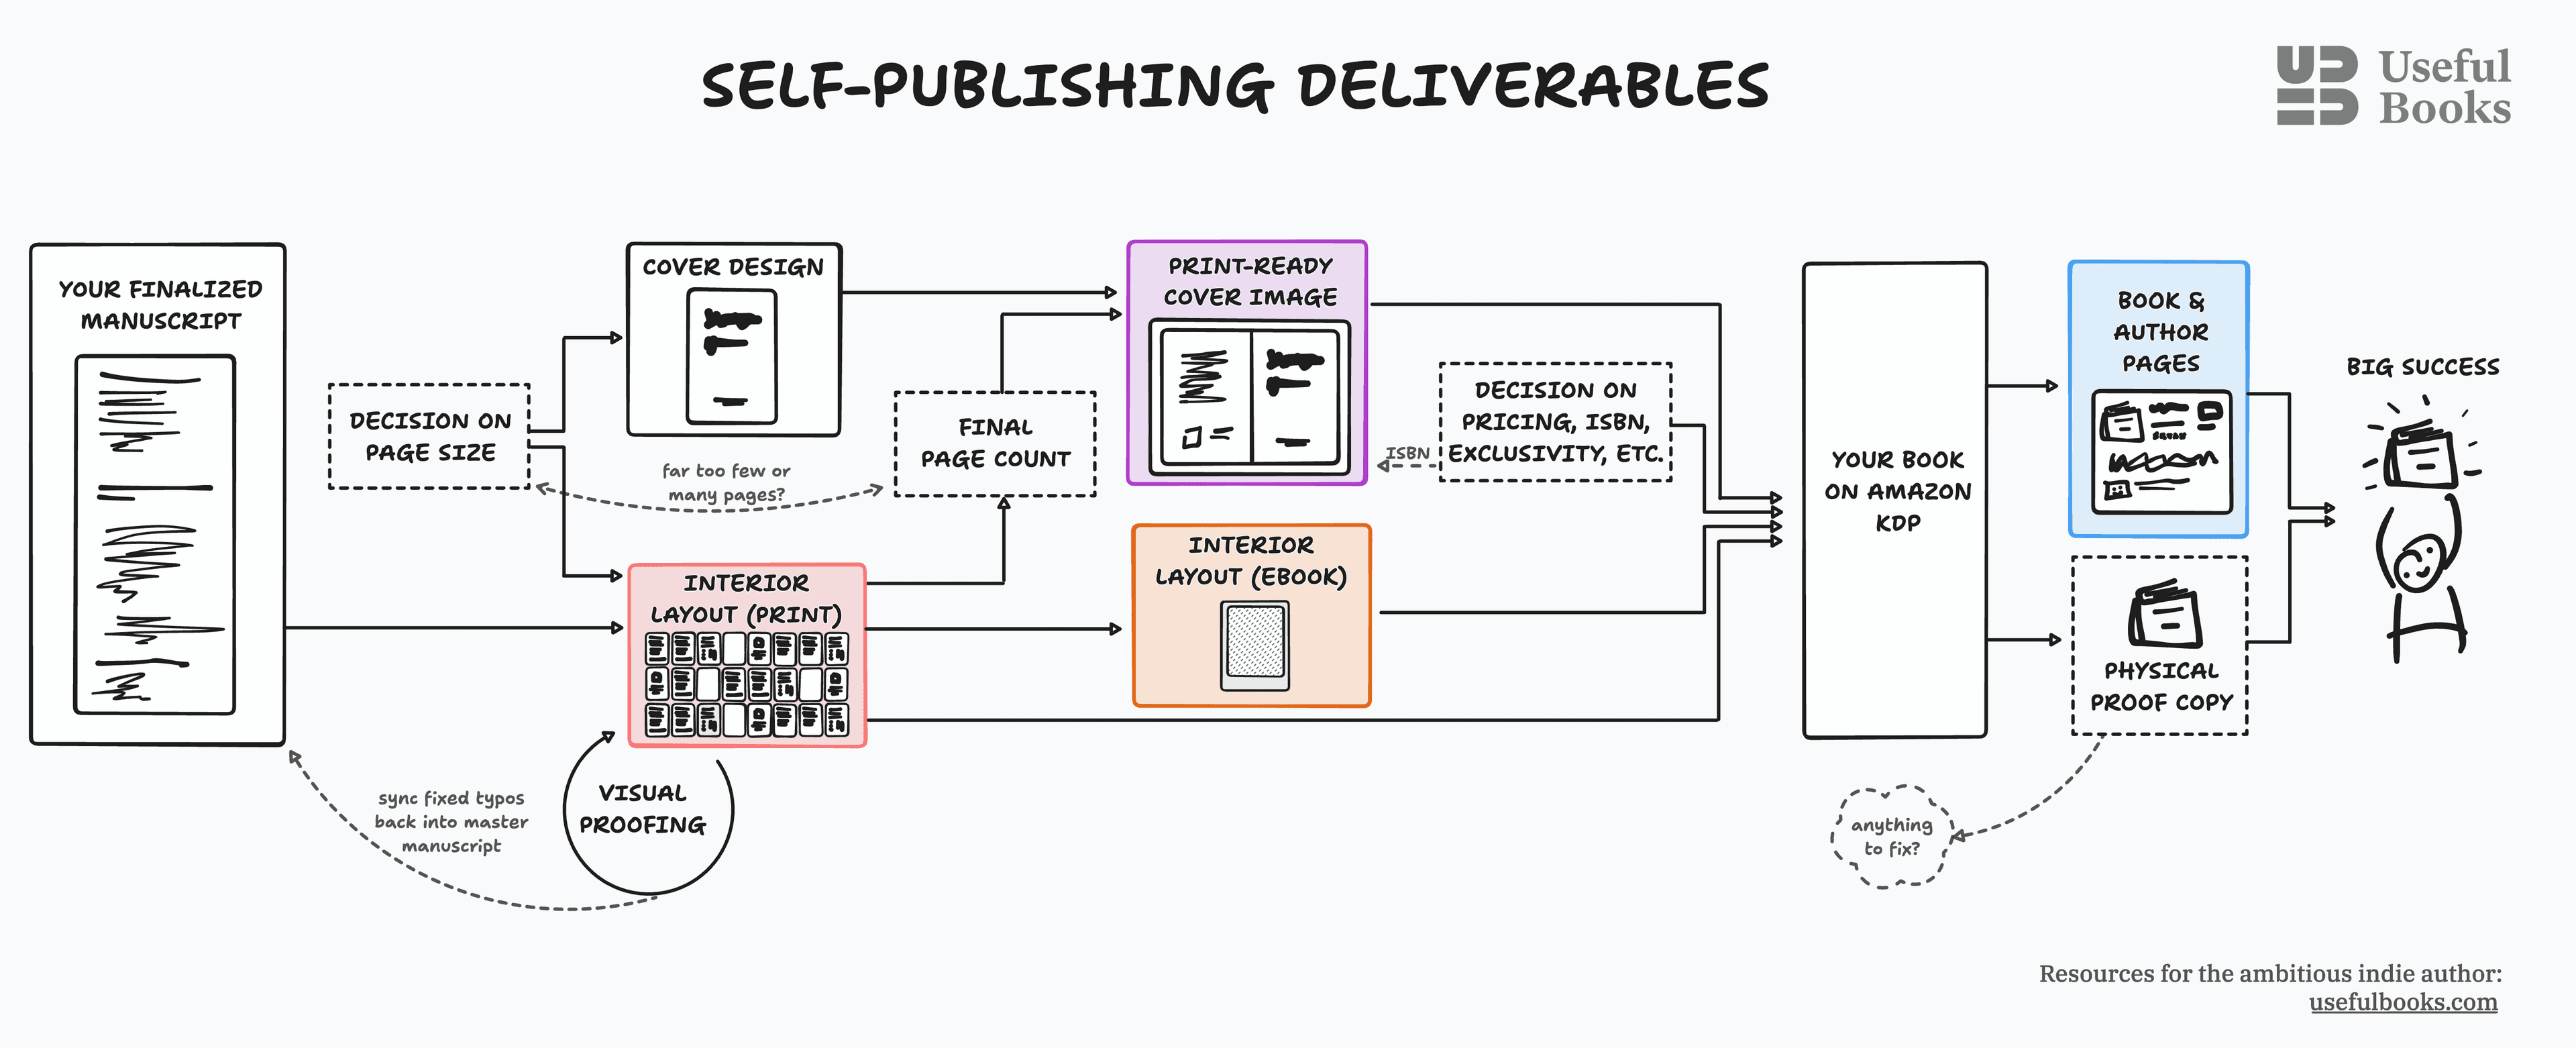
Don’t worry if that diagram still seems a bit mysterious. We’ll break it down step by step and tell you what to look out for.
1. Pick your trim size
The very first thing to do is a simple decision about your book's physical dimensions, or "trim size."
Knowing the trim size is a precondition for both interior layout and cover design.
The most common paperback sizes are 6x9” and 5.5x8.5”, although KDP offers lots of options
As a rule of thumb, unless your book's visual design requires an opinionated form-factor, I’d recommend using 5.5x8.5” for 110-150 pages and 6x9” for 150+ pages.33Too many pages in too small a package can feel like holding a brick instead of a book. Conversely, a bigger trim size with fewer pages can feel like holding a magazine or pamphlet.

Unblock is 6x9” and Write Useful Books is 5.5x8.5”
You can estimate your page count by knowing that a typical paperback has 250-275 words per page.
So a book that’s mostly prose would come in at 120 pages for 30,000 words, or 200 pages for 50,000.44However, if your book includes loads of visual elements or is otherwise heavily designed, you’ll need to throw these estimates out the window and talk to your designer.
On top of the core contents, you’ll also need to add an extra 10-20 pages for front- and back-matter like a table of contents, copyright page, blank pages, and any other extras like acknowledgements or an index.
Once you've estimated your page count, you can pick a reasonable trim size and move on to the first real deliverable: interior page layout.
2. Interior page layout (paperback)
Your print page layout comes as the first major task, since it will determine your exact page count (required to know the exact spine width for your cover image) and also allows you to catch any final typos prior to doing the ebook layouts.
2.1 Layout complexity and DIY vs. delegation
At its simplest, interior layout means taking your manuscript and formatting it with the proper page size, margins, page breaks, page numbers, and a title page. However, there’s a lot of fiddly detail to get right.

Fig. Interior layout, showing print considerations like alternating margins, chapters starting on right-hand pages, and book-style headings and page numbers.
In general, interior layout goes one of two ways:
- For prose-heavy books that are able to be prepared with the DIY tools of either Vellum or Atticus, it's trivially easy and should be done yourself
- For design-heavy books that require custom page layouts, it's extremely tedious and will probably involve a freelancer
Vellum and Atticus are both great. They're easy to use, generate beautiful typography, and will handle both your paperback and ebook. But... they're also inflexible. If you need something slightly different than what they can do, you'll need to go to the other extreme with a fully custom layout.

Vellum (left, $239, free trial, OSX only) and Atticus (right, $139, 30 day refund) are both excellent choices for professional-level DIY of prose-heavy books.
The choices for fully custom layout are harder. If it's still basically a single-column layout plus extra stylistic elements like callouts and insets, you can get there using MS Word (or even GDocs, if you're willing to jump through a few extra hoops). In my experience, this requires 20-40 hours of focused research and fiddly trial-and-error.55By "fiddly trial-and-error", I mean that you should mentally prepare yourself to experience at least one tantrum per day as you rage at the sheer undocumented stupidity of it all.
For "magazine-style" layouts, you'll need to turn to either Affinity Publisher (my recommendation) or Adobe InDesign. Frankly, doing this DIY is an impractically huge task. So unless you already know how to do it (or really want to over-invest in learning), I'd recommend just paying someone to get it done. It won't be cheap.
2.2 PDFs and proofreading
Traditionally, proofreaders work from the prepared PDFs of the interior layout, and many “classically trained” freelancers will therefore suggest doing the same.
I am strongly opposed to this practice. When too many corrections are made directly onto the page layouts PDF, some of those corrections inevitably fail to make it back to the master manuscript, which desynchronizes it. Once this happens, not only do you need to catch those same typos again for your ebook layouts, but it also massively complicates the process of releasing updates, revisions, and new editions.
As such, I prefer to do the bulk of my proofreading prior to the interior layout, while the manuscript is still in GDocs or Word, and not afterwards.66My proofreaders always tell me that this makes their job harder, which is probably true. But at the same time, it makes my efforts on the whole book (including future updates) a lot easier. So from a big-picture perspective, I still come out ahead even if I need to pay for a bit more of their time.
I still do a thorough round of visual proofing on the prepared PDFs, but with the hope that we’ll have already caught the bulk of the typos and can focus entirely on finding layout errors (like a bullet-point list split across two pages, or a sub-section header appearing right at the bottom of a page).
No matter how much early proofing you do, it’s inevitable that a few typos and other minor corrections will still come up in the final pass of the PDF. In those cases, you want to ensure the corrections are duplicated back to your master manuscript, and then, once the paperback version is fully approved, use that newly corrected master as the source for your ebook files.

Fig. Simplified view of interior layout. (Note the flow of corrections from visual proofing back into the master manuscript.)
2.3 Indexes, glossaries, and other "extras"
While not every book needs them, the creation of indexes and glossaries is a special skill that's often tacked on as an extra step of interior print layout. If you're working with a professional, that's fine, and you won't really have to think about it.
But if you're preparing the layout for the core contents yourself, it's also possible to hire someone specifically to create these extras, and then merge the the separate PDFs into a seamless whole. If you go that route, just be extra careful to ensure continuity of numbering, margins, typography, headers, and all the other little details that make a book feel like a book.
3. Interior page layout (ebook)
Compared to the paperback layout, ebooks are usually a breeze. If you want to do it yourself, Vellum (paid), Atticus (paid), and Kindle Create (free) are all great.
One of the reasons it's so easy to DIY is that the limitations of e-readers (like Kindle) essentially prevent you from getting fancy.
Which is also the source of authors' single biggest self-publishing blunder...
3.1 Beware of overly designed ebooks
Here's an unfortunate reality that many authors refuse to accept: ebook readers are built for single-column text.
You get a column of text, centered images, linked endnotes, titles and subtitles. That’s about it.
Given these contraints many authors try to find a way to "trick" the system to get fancy.
My honest advice is: just don't.
The more designed you make your ebook, the less well-supported it will be across devices. And if it bugs out on some obscure e-reader, people won't blame themselves. They'll blame you, complete with one-star review.
If you want your ebook to sell, then keep your ebook simple.
And whatever you do, be sure to verify it with the Kindle Previewer, which emulates the kindle hardware on your desktop so you can see exactly how your book will look on various devices.
4. Cover images
There are two different tasks to preparing your cover:
- Designing it (i.e., what goes where and how it looks)
- Preparing and exporting the pixel-perfect cover file
There are a million ways to design your cover, from freelancers or crowdsourcing to DIY templates.77Always begin with a moodboard. Regardless of how you approach it, I strongly recommend beginning by finding at least six examples of covers from other books that are similar to what you’d like.
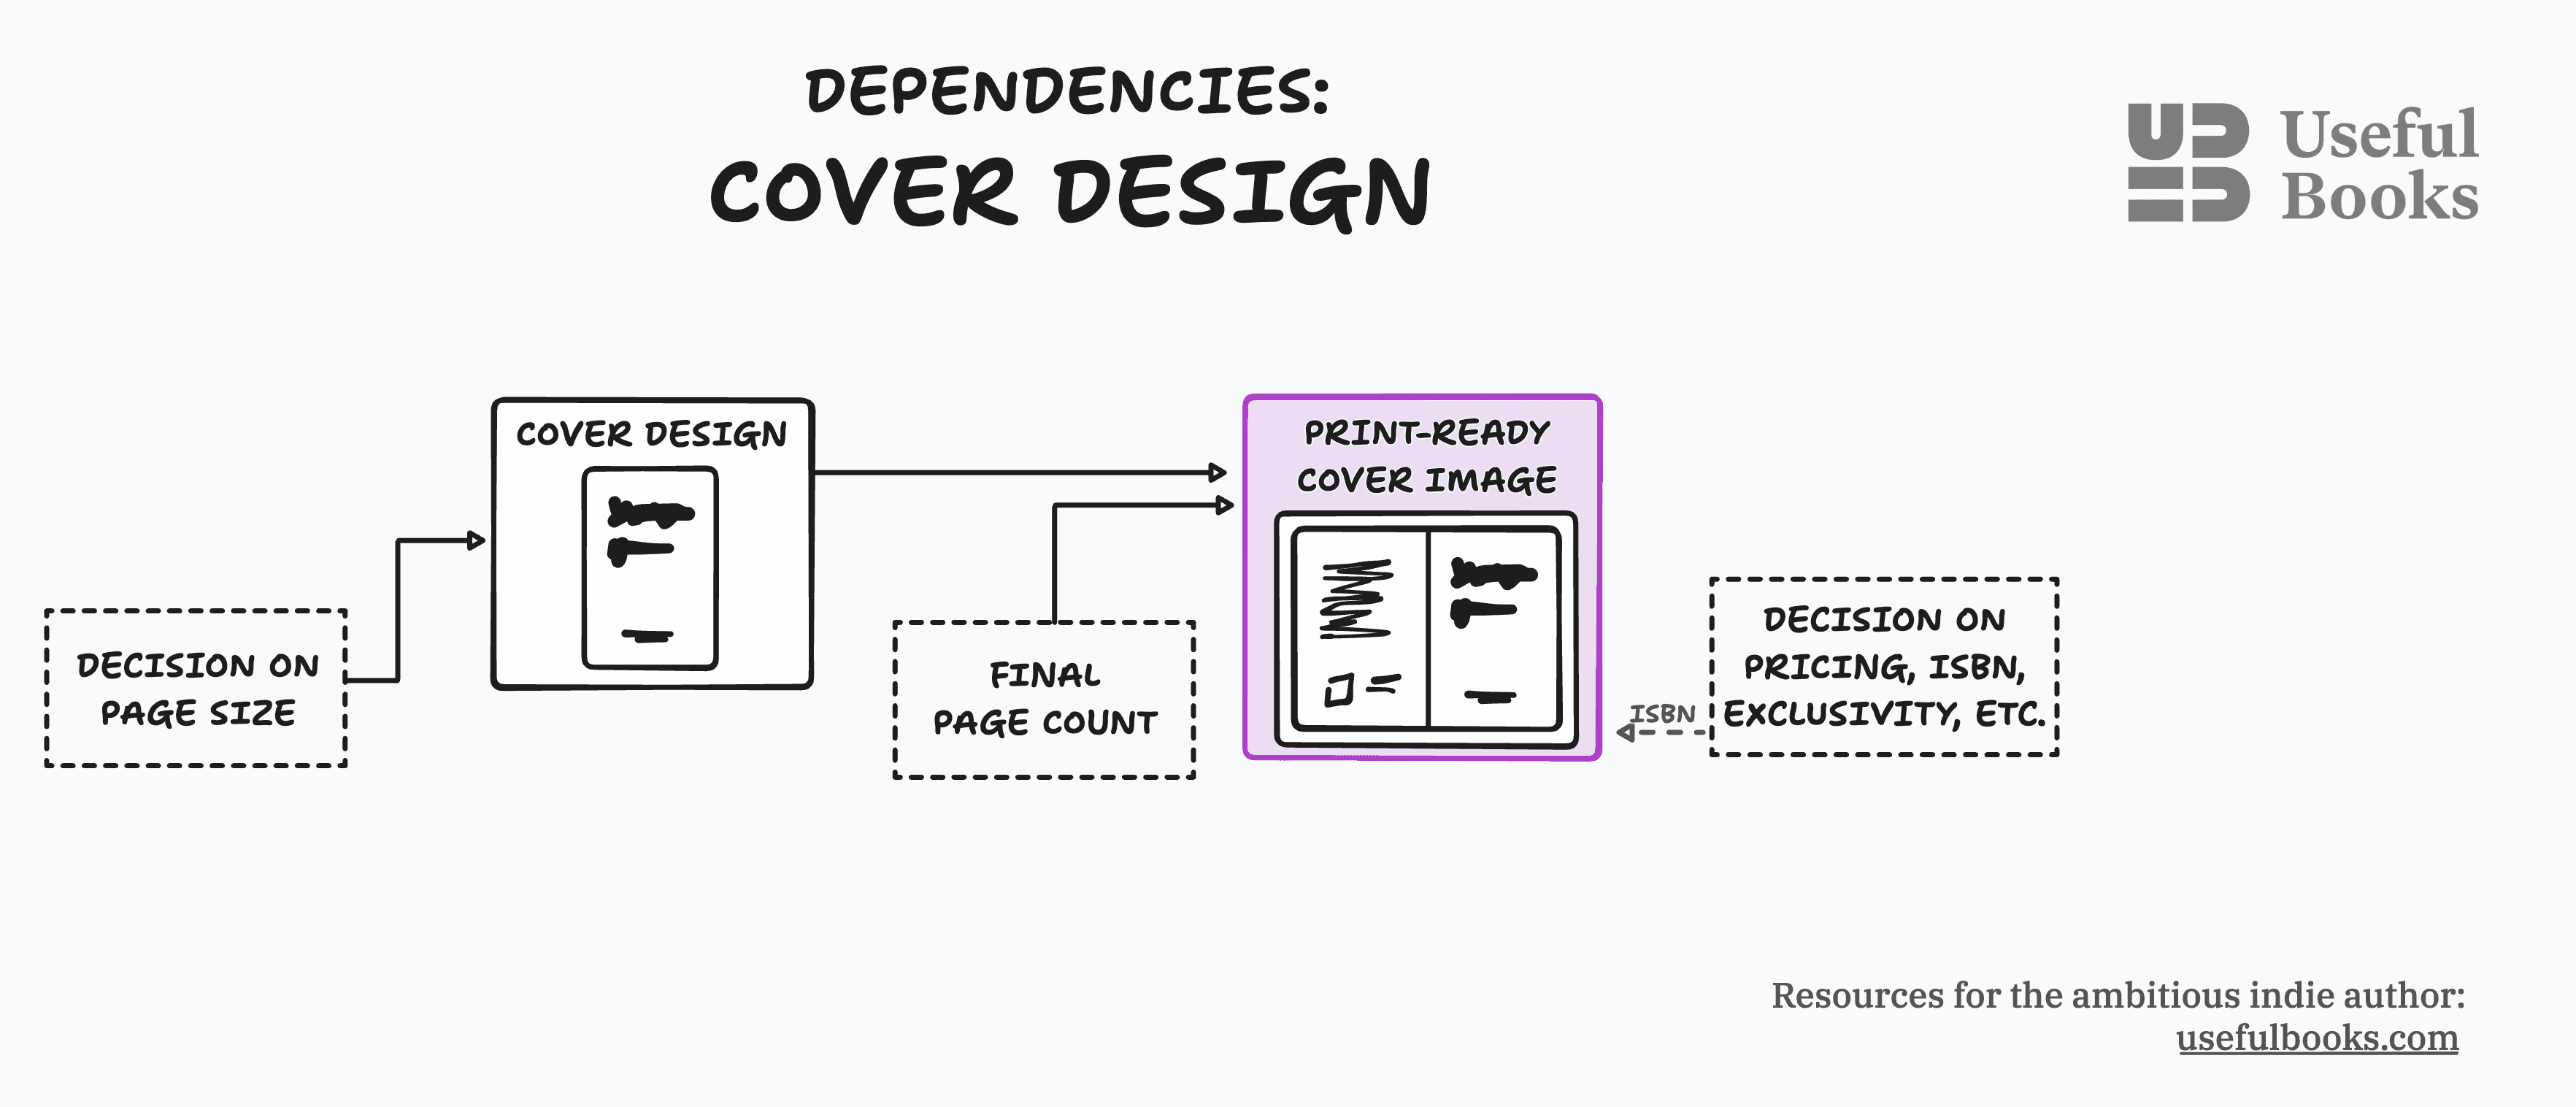
You can begin designing your cover whenever you want, as long as you know your book’s trim size (i.e., its width and height).
4.1 Final export
However, the paperback cover’s final export—including pixel-perfect sizing of the margins, bleed, and spine—will need to wait till you know the exact number of pages.88If you’re using your own ISBN (i.e., the book-identifying serial number and barcode), then you’ll also want to have that ready before final export so you can add the serial number and barcode.
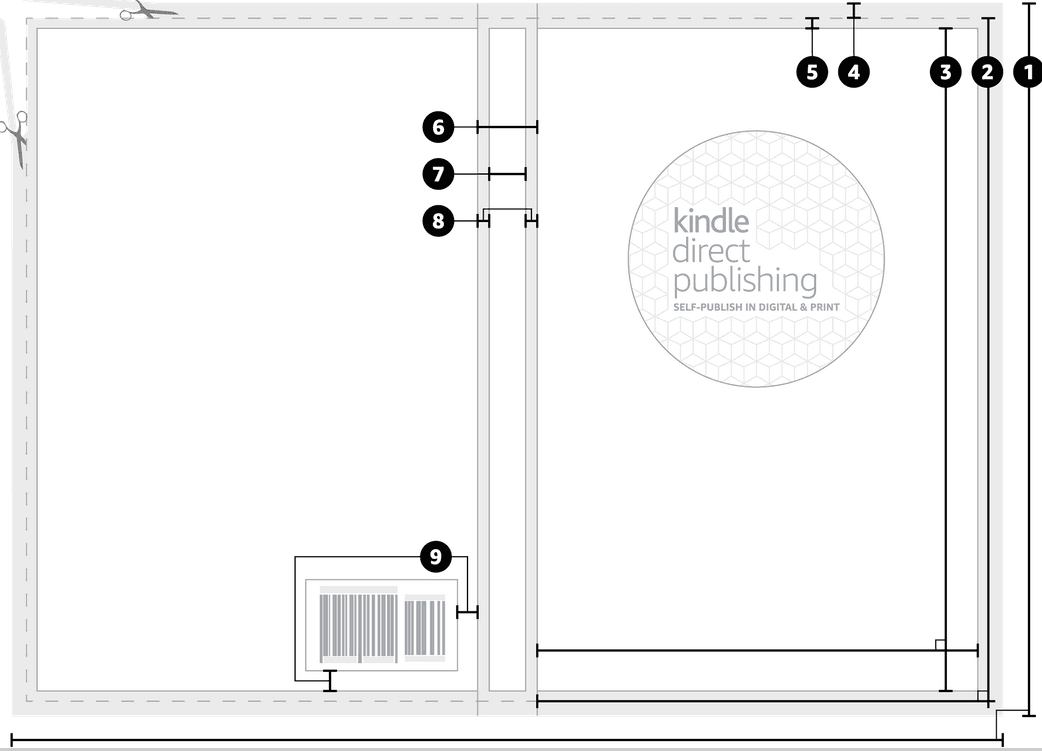
If the terms “margins, bleed, and PPI” sound like complete gobbledygook, then you’ll probably want to hire a freelancer99While any visual designer could help with your cover’s visual design, I recommend hiring someone book-specific to help with the final export. There’s a bit of industry know-how tucked into some of the stuff like spine width and print margins, and errors won’t be apparent until you get hold of a physical proof copy, which can add weeks to your publication date. to help with preparing and exporting your final files. But if those terms make sense, then you can easily prepare the files yourself by following a guide like this.
A lot of authors like to do the creative design portion of this task themselves, since the cover is such a personal thing, but it's also relatively easy to hire for.
Unless you require a ton of creative guidance and iteration, you can generally expect to pay anywhere from $50 to $500 to hire a freelancer, and they should be able to get your cover done within a few weeks.
4.2 Cover variants
Based on your original cover, you'll also want some variants, including:
- Rectangular for the ebook (and optionally PDF)
- Square for the audiobook
- 3D mockup for your book website and marketing material
If you're working with a freelancer, ensure you get the original, high-quality image files as part of your contract so that you can easily make these variants when needed.
5. Extra info for Amazon
Congrats, you're nearly there!
Now that you've got your page layouts and cover files, you can start uploading to Amazon via the KDP dashboard.1010KDP = "Kindle Direct Publishing," which confusingly also handles your paperback.
5.1 Getting an ISBN
An ISBN is the book-identifying serial number and barcode you see on the back of every book.
You buy ISBNs from Bowker who, like any good monopoly-holder, will attempt to fuck you over by selling them in packs of either one ($125) or 10 ($295), when what you really need is 31111It’s like packages of 8 hot dogs vs. 6 buns, but more egregious. In any case, rather than buying 10, using 3, and wasting 7, it might be worth asking some author friends whether they happen to have any spare ISBNs lying around. Hint hint. (I.E., one each for your paperback, ebook, and audiobook).

Your imprint shows up as “Publisher” in the Product details section of your Amazon listing
5.2 Creating your Amazon listing
It’s going to take time and patience to set up your book properly on Amazon. It can be annoying, but it’s worth the effort — you’re effectively setting up your store front. This is where readers will decide whether to buy your book or not; make sure they have everything they need to make the right choice.
Important resources:
- Your Amazon KDP dashboard, where you upload your cover and contents for paperback and ebook
- Your Amazon Author Central Dashboard (if you feel like something is “missing” from the main KDP dashboard, or your book’s store page, then it’s probably hidden here)
- Amazon's full KDP docs.
Most of the setup options are fairly self-evident. Here are our suggestions for the few that aren't:
- Exclusivity? No. Unless you're writing serial genre fiction, you’ll usually want to say “no” to Kindle exclusivity since it prevents you from doing stuff like selling PDFs or upsell bundles on your own site. The perks of exclusivity mostly involve an increased array of discounting and promotional options that are quite powerful for fiction, but less so for useful nonfiction.
- Global distribution? Yes. Say “yes” to global distribution — there’s no downside. Optionally, set lower regional prices for regions where U.S. book prices are prohibitively expensive.
- Print on demand, not by yourself. For the paperback, use Amazon’s print on demand instead of the other option (“fulfillment by Amazon”) which requires you to print the books yourself, ship them to various warehouses, and keep track of inventory. The apparent savings of doing it yourself will disappear as soon as you factor in the costs and hassle of inventory management, logistics, and everything else that Amazon otherwise handles for you. (The only exception would be if your books require lots of high-quality, full-color photos that Amazon isn’t able to print. Although in that case you might be better-suited by another print-on-demand option like IngramSpark.)
Suggestions for pricing and royalties:
- 70% ebook royalties. You probably want to price your ebook at the “soft maximum” of $9.99. You (currently) get 70% royalties on a price of $1.99-9.99, and only 35% royalties if you’re higher or lower than that range. (Full docs for ebook royalties.)
- 40-60% paperback royalties. You pay Amazon a flat fee per book for printing (based on page count, dimensions, and your choice of paper/cover quality). After that, you get 70% of what’s left. This means that your paperback royalty percentage will increase/decrease as you make your book more/less expensive (since the flat printing costs will eat up a larger percentage of a cheaper book’s cover price). (Full docs for paperback printing costs and royalties.)
- Avoid the cheapest prices. If someone will buy your book for $2, they’ll buy it for $10. This has a significant impact on your monthly earnings. (The only exception is if you want to run a discounted ebook version when you’ve just launched in order to gather more verified reviews.)
5.3 Kindle quirks and gotchas
Don’t micromanage page layouts. I said this already, but it bears repeating since it decimates your sales to get it wrong. You can still include images and emphasis in a kindle version, but should allow the text to flow where it wants to flow.
Verify the formatting. Amazon provides a software emulator to view your files on a range of Kindle devices. Use it.
Don’t force updates. If you update your book after launch, there’s an option to “force” the new version onto Kindle customers. As appealing as this appears, don’t do this — it will wipe your readers’ highlights and notes, which makes them sad. Leave the update as optional.
Pre-sell it only once you’re confident in hitting the date. You can pre-sell a Kindle version, but not a paperback. If you miss the launch deadline, you can move it once, but Amazon will remove your pre-selling privileges for a year afterwards as punishment. If you miss it again, they cancel all your pre-orders and leave you with no way of contacting those customers.
Updates are not instant. Uploading a new cover or interior takes a couple days to process since Amazon manually reviews it, so don’t set too tight of a launch deadline. In some cases your book will also be marked as unavailable for purchase during those 2-3 days.
Don’t panic; call them. If you run into a seemingly intractable obstacle, Amazon KDP phone support is surprisingly helpful. The phone option is accessible through the KDP contact page while you’re logged in.
6. How to start today
A good first step is to decide which of these tasks you want to tackle yourself, which ones you want to skip, and which ones need freelancer help.
From there, you can start on several tracks at once — find a cover designer, buy your ISBNs, choose an interior layout tool.
Of course, you don’t have to do all the tasks in parallel — you could wait until your interior page layout is complete before even starting on cover design, and you can wait to complete your Amazon listing until everything else is done.
The part that extends your timeline the most is probably finding and vetting freelance help, and getting your book into their backlog. So consider starting with that.
And remember: lots of people are managing to successfully self-publish each year, many of whom are first-time authors. If they can muddle through, so can you. Many of the required tasks are indeed a bit fiddly and tedious, but they’re also fairly predictable, solvable, and low-risk. You can do them. And help is available — via the Useful Books Community — if you need it.